Greetings, and welcome back to another installment of CorvSport’s new DIY series, where we canvass the internet for the best do-it-yourself guides. Let CorvSport be your digital encyclopedia and bring you the best guides and resources from our vast Corvette community. This series can also give enthusiasts contemplating a DIY project the clarity they need to realize they should hire an expert. All our DIY guides address common Corvette issues and upgrades, and today’s covers the C7’s brake system. The Z51 option has always been a popular box to check, but not every owner does so when ordering. No worries, because today, we’ll show you how to upgrade to this popular option.
CorvSport Complexity Guide
- Difficulty: 7 (10 most difficult)
- Patience Needed: 8
- Level of Specialty Tools Required: 7
- Is a Helper Recommended? No
Today’s guide comes from Corvette Forum member “FYRERANT” and is the most comprehensive guide I could find on the internet. This curated C5 guide is fully credited to “FYREANT” and is being presented to our CorvSport community in an unedited format.
How To Upgrade Your Base C7 Corvette Stingray To The Z51 Brake System
Introduction
So you decided to go with a non-Z51 or better yet, you couldn’t get ahold of a Z51 when you picked up your Stingray. Now that you have been driving it, you regret not being able to get the upgraded brake system. No worries, you can add it later! I upgraded my base model brakes to a full Z51 brake system yesterday. Here are some images, steps to complete, and tips.
Step 1: Gather the needed parts
- Z51 Left Front Caliper (1)
- Z51 Right Front Caliper (1)
- Z51 Left Rear Caliper (1)
- Z51 Right Rear Caliper (1)
- Z51 Front Rotors (2)
- Z51 Rear Rotors (2)
- Z51 Carbotech Front Pads (1 set)
- Z51 Carbotech Rear Pads (1 set)
- 1.5-2.0 Liters of brake fluid, (DOT3, DOT4, or DOT5.1, your choice)
- OPTIONAL: Upgrade to Stainless Steel brake lines. you are already opening up the sealed brake system, might as well do these while you’re at it!
Step 2: Preparation
First, jack the WHOLE car up. You need all four corners off the ground at the same time. Take off all four wheels as well.
Step 3: Remove the existing brake pads
First remove these two pins (shown below). You can use a small flat ended center punch to do this. Push them towards the inside of the car and remove them, as well as the retaining clip. After this, the brake pads can be wiggled out of the calipers and set aside.
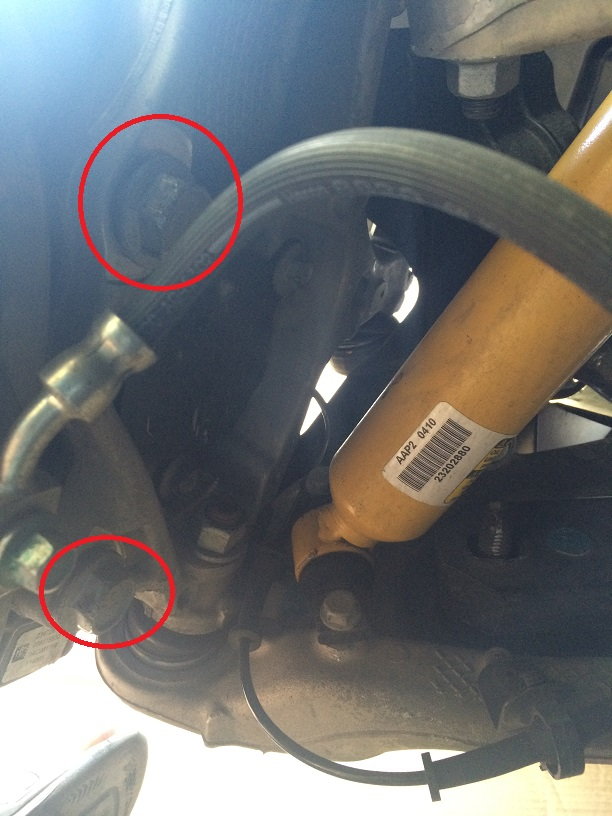
Step 4: Remove the brake line from the caliper
Remove the bolt pictured below, which is a 14MM. Be careful to catch any fluid that may spill out from the line in an approved container.

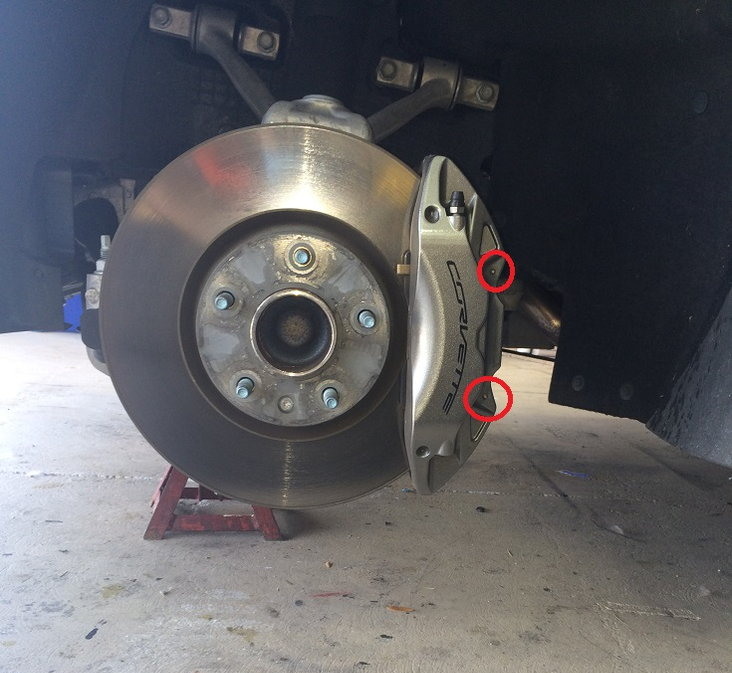
Step 5: Remove the caliper
Remove the below two bolts and the caliper should come right off. The bolts are 21MM, and are on there very tight!
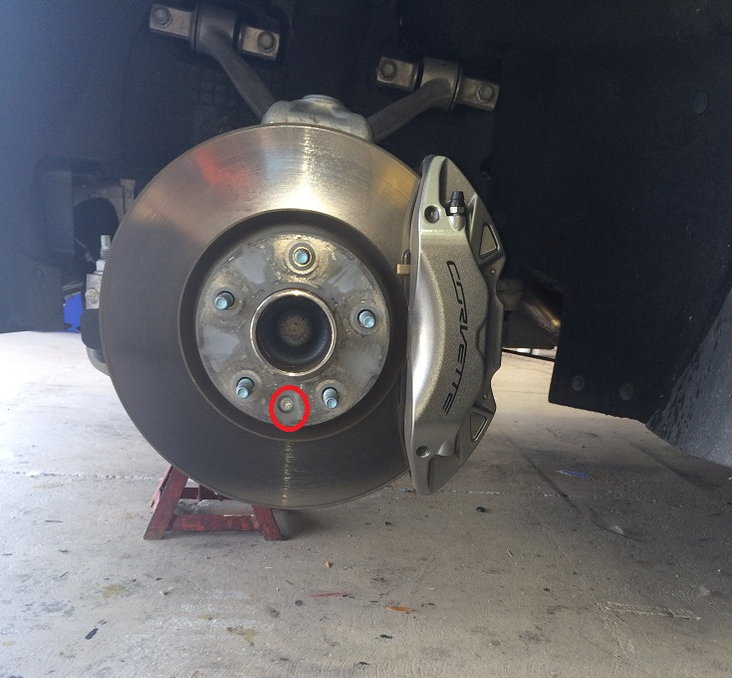
Step 6: Remove the rotor
To do this, remove the bolt pictured below which is used to retain the rotor from moving around. This bolt is a Torx head bolt.
Step 7: Replace the brake lines with the upgraded stainless steel ones
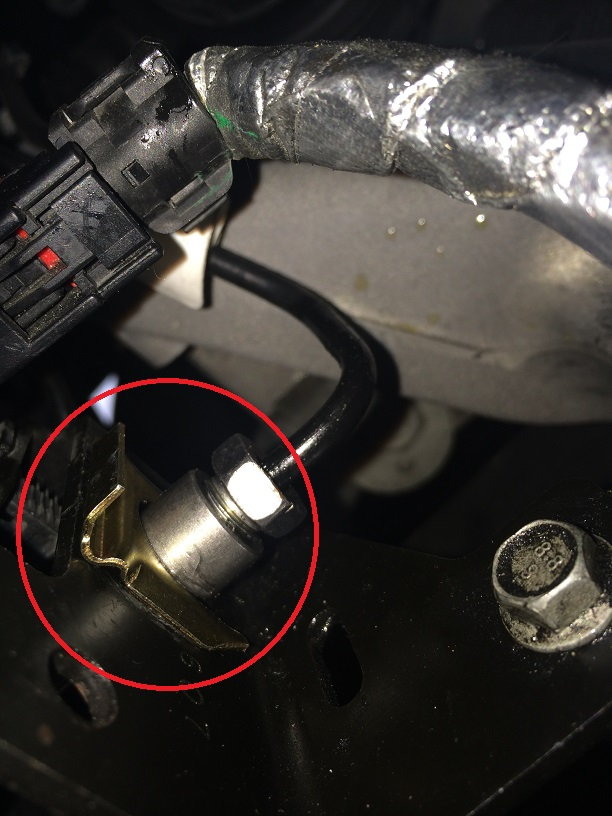
With the rotor off, lets proceed with the optional step of replacing the brake lines with upgraded ones if you are choosing to do this. The brake line pipe fitting nut, shown below, it is a 13MM. Once again make sure to catch any spilled fluid in an approved container. Next, remove the gold clip shown below. It needs to come up to release the line. After this, the line should come right out for you to swap. Reverse process to put your new upgraded stainless steel line in. The brake line nut should be torqued to 13 FT/LBs.
Step 8: Install new rotor
Next, replace the rotor onto the hub, and replace the retaining bolt.
Step 9: Prepare the brake caliper bolts and caliper threaded holes for assembly
- Thoroughly clean the residue from the bolt threads with denatured alcohol or equivalent and allow to dry.
- Thoroughly clean the residue from the threaded holes with denatured alcohol or equivalent and allow to dry.
- Apply threadlocker to 2/3 of the threaded length of the bolts. Refer to Adhesives, Fluids, Lubricants, and Sealers.
- Ensure there are no gaps in the threadlocker along the length of the filled area of the bolts.
- Allow the threadlocker to cure approximately 10 minutes before installation.
Step 10: Install new caliper
Put your new caliper on and install the two large 21MM bolts back in. These need to be torqued to 162 FT/LBs. Yes you read that correct! 162 FT/LBs!! NOTE: Rears are to be torqued to 89 FT/LBs. Also the bolts need to have thread locker on them (Loctite).
Step 11: Install the banjo bolt
After the caliper is on there, you are ready to install the banjo bolt for the brake line back onto the caliper. To do this, make sure you put one of the copper washers on the bolt first, then put the bolt through the banjo fitting, then another copper washer, then screw into the caliper. This way you have a copper washer on both sides of the banjo fitting. Torque this bolt to 30 FT/LBs.
Step 12: Install new pads
Once that is done you are ready to install your new Carbotech pads. I chose to go with 1521’s all the way around. Slide your new pads in making sure the metal backsize is facing the pistons in the caliper. Replace the retaining clip the same way it was when you took it off as well as the two pins.
Step 13: Repeat for all four wheels
Now that everything is back together, you need to repeat the process for all four wheels. Once all four wheels are complete, you need to properly bleed the brake system. Theta has posted a guide on doing this which I used. It can be found here: How-To: Bleed Brake System / Change Brake Fluid (Manual & Pressure) + Specs
Step 14: Tips and recommendations for bleeding your brake system
- The number 1 tip is do NOT touch brake fluid to paint! it will eat it alive!
- If you are going to use a vacuum bleeder, you may have a hard time getting the tube to seal properly to evacuate the air from the line. If that happens it will seem like the air just keeps coming out. Recommendation would be to put a big glob of grease or vaseline around where the bleeder tube connects to the nipple to seal up any leaks.
- Personally, I do NOT remove the cap from the brake master cylinder reservoir when I disconnect the brake lines. Reason being, is by keeping the cap on, it creates a small vaccum towards the top of the system which helps so you loose less fluid when disconnecting the lines.
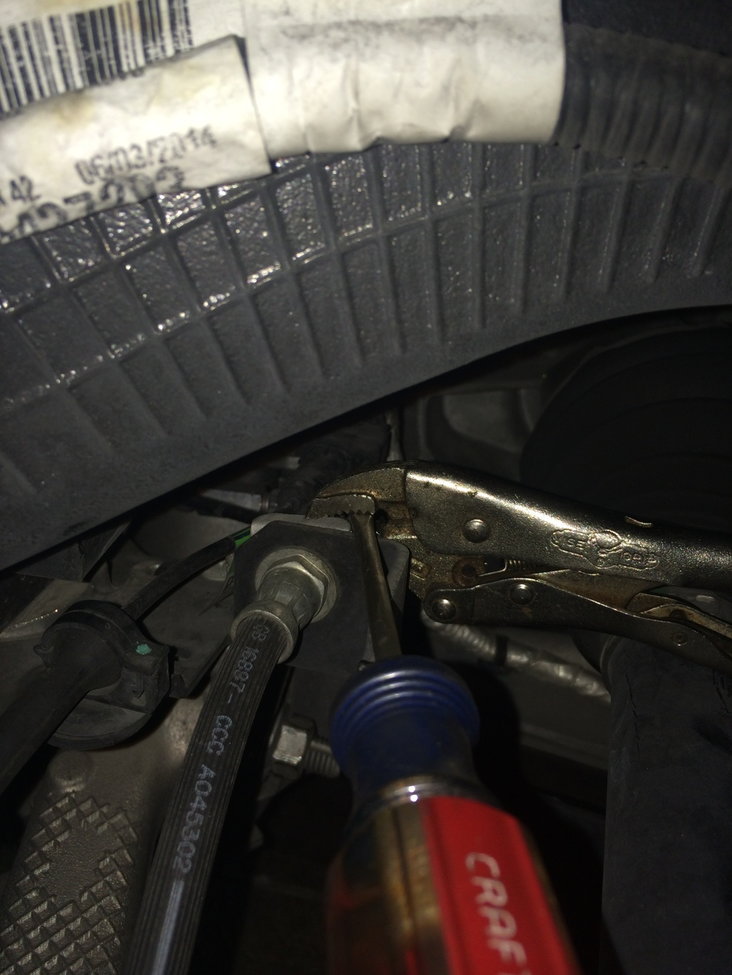
- If you are having trouble getting the gold clips out that hold the brake line in, try clamping a set of Vise-Grips onto the edge, then using a screwdriver to pry the Vise-Grips up. (picture below)
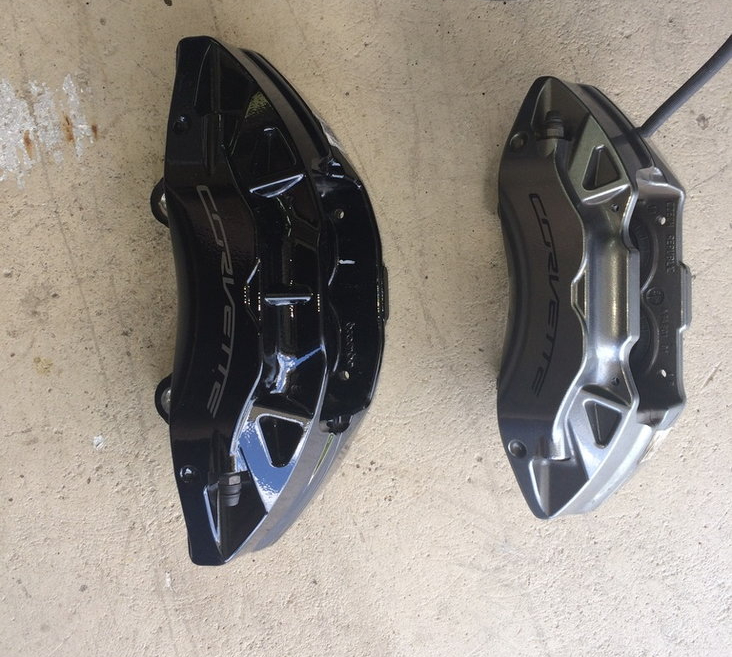
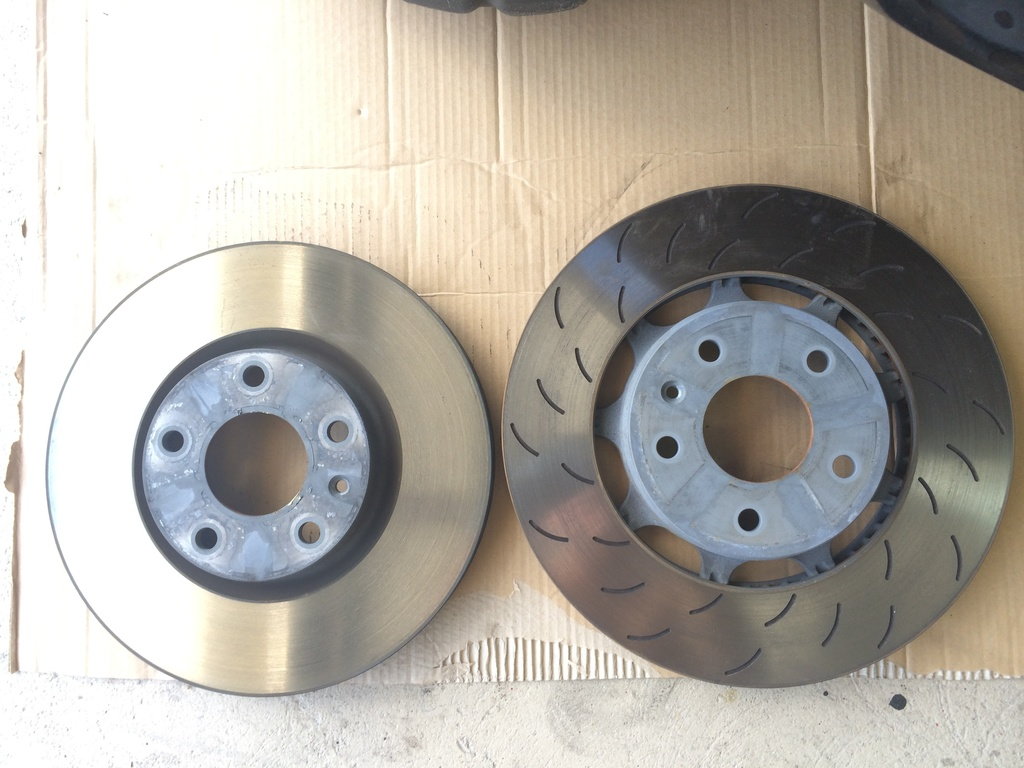
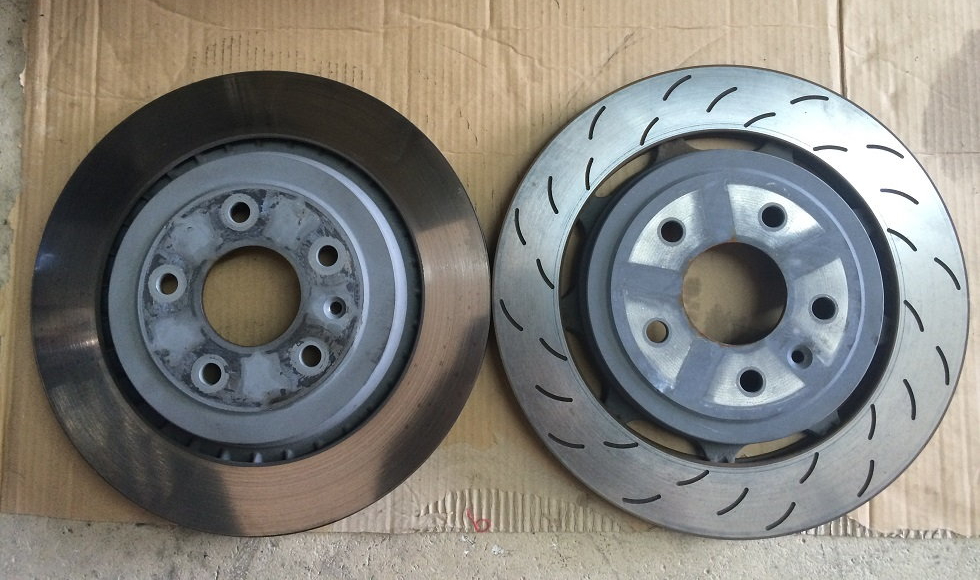
Base model versus Z51 comparison images
- Brake calipers (Z51 are the black ones on the left)
- Front brake rotors side by side (Z51 on right)
- The rear rotors and calipers are the same size for the base model as the Z51. Just a different color caliper and the rotors are slotted. Again, Z51 on right.
Lastly, these brakes should be cooled properly. So if you do this upgrade, consider also adding the Z51 brake cooling system ducts and deflectors. I have a guide for that which can be located here: HOW TO: Adding Z51/Z06 Brake Cooling Ducts and Deflectors to Base Stingray
Hope this helps guys.
Ant
The End! If you want to keep up to date with all the fresh Corvette news and maintain a pulse on the lifestyle and culture of this exciting, iconic brand, CorvSport has the fastest-growing Corvette community on our Facebook page, with over 172,000 followers (53,000 since January 2023!). Come join other hardcore enthusiasts and say hello, Douglas B.